Phase 3: Design
Prototyping with Fab
Group
Subject
Your subject is "".
Teammates
Tutor
Your tutor is .
Your appointment is on .
Part 3 Rules Reminder
Click here to review rules
Before the meetings:
-
Know the subject of your appointment.
You must have read the course modules and prepared the questions you wish to discuss with the tutor. -
Know how to locate the progress of your team.
Take the time to formulate the difficulties encountered and the positive points. Don't wait several weeks before reporting problems. -
Organize a meeting.
Except in exceptional cases, find yourself in the same place. A suitable place (quiet) with a good internet connection, for the smooth running of your interview.
During meetings:
-
Your presence is mandatory at all meetings.
Any absence must be justified to your tutor before the meeting in the Slack channel of your group. -
Your camera must be on.
The tutor is there to accompany you synchronously, not to talk to an avatar. -
Behave like a professional.
Adopt an employee posture in a company in all circumstances: holding in front of the camera, appropriate language, listening skills, correct clothing. -
Lead this project in good spirit.
Your participation in the meetings is mandatory and is part of the course. You are not a cruise passenger. Remember to react to the comments made to your group but also to interact with the other groups present.
When the tutor gives the speech, everyone must speak! -
Take advantage of your appointments collectively.
You must divide up the roles: designate as many "scribes" as necessary for each meeting. It is mandatory to write a group interview report and post it in the group channel at the end of the meeting.
Outside of meetings:
-
Collaborate with the tools at your disposal:
-
Slack:
The group communication must be done on Slack in your group channel.
→ If you discuss elsewhere, your tutor cannot accompany you, it is a waste of time, resources and especially advice.
→ Make reports and post them on Slack to get feedback from your tutor.
→ Individual maluses will weight your final score according to your participation.Any student who is not on Slack at the beginning of Part 3 will be graded 0 for Part 3.
Any student who does not participate in the Slack channel of their group will be graded 0 for Part 3.
-
Zoom:
You can use Zoom in group at any time to chat in video and share your screens: type/zoomin your Slack group channel, a button will appear in the channel to join a Zoom room.When launching a Zoom room for the first time, you will have to validate your account by clicking on the "Authorize Zoom" link, then connect with SSO ("Sign in with SSO").
→ In the field "Your company domain", enter "em-lyon".
→ Finally, authenticate on the emlyon portal.
-
-
Be there for others.
Reactivity towards your tutor and your collaborators on Slack is essential. Put yourself in the shoes of a professional who leads a project as a team. -
Document
You must constantly document what you are doing. Keep as much record as possible of the exchanges and work done so that you can analyze what worked in the project and what didn't.
The objective of this phase is to design and document the final version of your prototype.
Why designing a final prototype?
The first versions of your prototype were raw models quickly built to perform user tests and refine your proposals.
The results of these improvments have given you all the necessary bricks to assemble the final version of your proposal that will best represent what your ideal product could be.
In this part you will build an identifiable product, you will give it shapes and colors according to the emotions and values you want to arouse in the user.
You will also work on ergonomics by making the functions as readable, accessible and usable as possible.
Due to the COVID19 outbreak you will probably not be able to use the digital fabrication tools normally available at the makers' lab of your campus. Don't worry, you will still be able to produce beautiful prototypes! We will guide you to do so.
This is a team activity!
Although the work is collective, the evaluation will be individual ! and mainly based on your involvement in the project and in the group's dynamics
In this phase you will design, fabricate, and document your final prototype. To this end, you have to produce the following deliverables:
Prototype
1. Design your final prototype
We will design the final version of our prototype according to the requirements specifications we have rewritten at the end of the testing phase.
- Think to the globality of your project.What are its dimensions, ideal proportions? What should it evoke? What colors do you have to use? Start by sketching on paper what your product will look like, taking into consideration your previous prototypes and what your product should obviously communicate. You have to add your drawings to your Notion documentation.
- Think through the usage scenario. List the features of your prototype (3 max) and prioritize them. Find relevant tutorials on how to implement these features on a prototype (try to find multiple ways to do it !). You have to list your features and related tutorials you have found to your Notion documentation.
- Once you know what features to prototype and how, ask on slack the makers' lab managers for advice. She or he will give you some technical advices and will help you choose the material you need.
-
Think through the fabrication process. Lean on the makers' lab team's advice to divide your product into different subparts by thinking about how you will make them. Make clear the drawing of each part gradually. When your are satisfied by your drawings, use TinkerCAD and Illustrator to design your parts. You have to add your CAD files (links and screenshots) on your Notion documentation.
Do the same for the UX design part : draw each screens of your app on a piece of paper, then when you're satisfied with the result use Adobe XD to design your app. Once again add links and screenshots on your Notion documentation.
You need to design a final prototype that is desirable, usable and achievable:
-
Desirable mean simple, understandable and self-explanatory for any observer.
When you look at an electric scooter in the street, you know what it is without anyone explaining it to you. Shapes, colours, materials are more effective means of communication than words. Use them efficiently! -
Usable mean ergonomic, easy to access or obvious for any user.
When you use a smartphone, you don't need any instructions. A good product is intuitive. Pay attention to gestures, attitudes and habits. The usage scenario is your best tool: use it as much as possible! -
Achievable means that it is possible to make or reproduce it with accessible tools and techniques.
The 3D printers, laser cutter, and other tools in the makers' lab allow you to make almost anything. Use them as much as you like!
Color is an essential component of a product, it greatly influences the perception we have of it. By choosing the right colors in the right places, you will make it easier to use the object. And if your choice of colors is coherent and harmonious you will make the product more attractive and desirable.
- If you want to learn more about the importance of color in product design you can read this article
- To help you find matching colors you can use Adobe's color wheel, and even use artificial intelligence with Eva Design System, a color generator that uses deep learning.
2. Make your final prototype
- Make your final prototype using the skills you have learnt during this course. You have to add at least 3 pictures of your prototype, in use situation and screenshots of your 2D / 3D design and electronics in Tinkercadto your Notion documentation.
It is mandatory to:
- Use Tinkercad and Adobe Illustrator (or other 2D or 3d design software) to design the physical “shell” of your product
- Make a full-scale mock-up of your product that makes all the functions visible
- Use digital fabrication to build the better version of your prototype.
- Use Electronics or UX Design to make your prototype interactive (see the application section below to learn more abour Figma 👇)
Do not panic if your design is not perfect: it's normal!
Keep in mind that a prototype can fake its features but a user must not perceive this! Iterate on your design to make your prototype better.
If you want to draw in 2D parts for laser cutting, or design graphic elements (logos...) and you do not have access to Adobe Illustrator we advise you to use Gravit a free online vector graphics design tool.
- Take a look to the Gravit's youtube channel to learn how to use it.
- And to Gravit tutorials to improve your graphic design skills.
If it's relevant you can Use TinkerCAD Circuits to design the electronics of your product
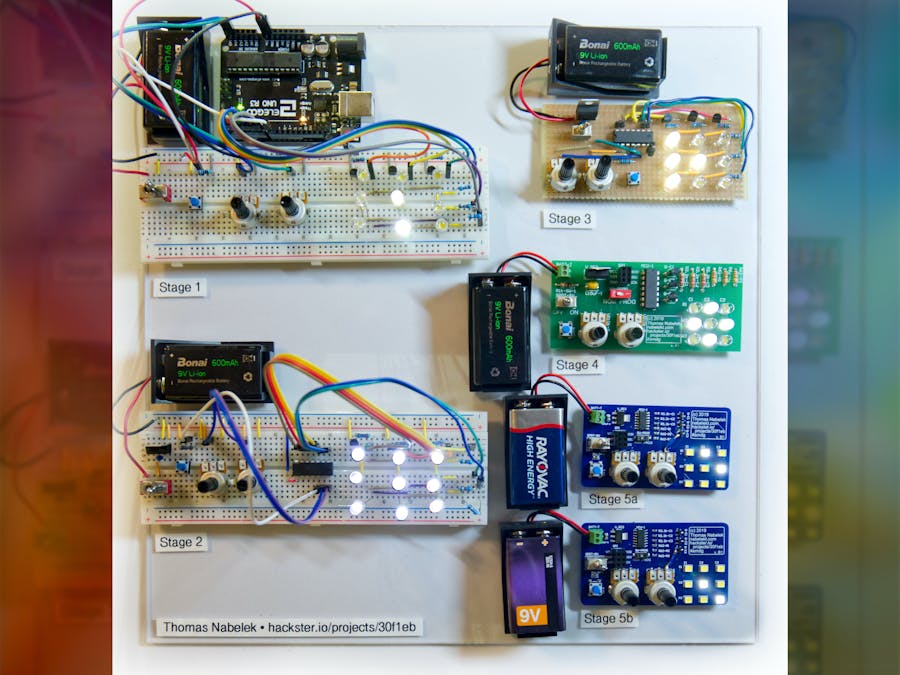
This is an example of what we mean by final prototype:

Application
If relevant you can complete your physical mock-up with an application mock-up using Figma, the all-in one UX/UI solution for designing websites, mobile apps, and more.
The application must complement the physical product and not the other way around!
In other words: the main function of your product must be provided by the object and not by the application.
Using Figma, you can design, prototype & collaborate all in the browser.
Figma setup
Start by creating your Student Account on Figma.Make sure to use your @edu.em-lyon.com or your @edu.emlyon.com e-mail adress, it will provide you a Student Account without sharing limitations.
Then,validate your Student Account by completing the form as shown below 👇 in order to be able to collaborate with your team.

See this article on Figma to learn more about your Student Status.
Figma's basics
Now that your Student Account is created and validated, and before starting your wireframes, follow this tutorial to discover the basics of Figma:
You're finally ready to create a bare minimal app to describe how, from a home screen, your users would access the most important features of your service with as few screens as possible (e.g. for Uber, this feature should be "how to order a driver") and how your app will be linked to your product.
Figma Community shares hundreds of files to design faster with lo-fi mockups, user flows, simple prototypes, and diagrams. To help you quickly prototype, duplicate this Lo-Fi Wireframe Kit with over 100 wireframing components, and copy elements from this kit to create your wireframes.
Do not try to integrate graphic resources (images / fonts / …) during this step but focus on users scenarii. Have a look at the Figma project below 👇

Don't wireframe the sign in/sign up features, pretend your user is already identified on their homepage and focus on the main features of your prototype.
Figma allows to share your project with anyone. You just have to click on the "share" button on the top right corner of your window, and share the link with edit rights to your team and tutor on Slack.
Ressources
- How to wireframe (must see)
- What makes a good wireframe ?
- I❤️ wireframes, a wireframes collection
- Figma Ninja a game based tutorial for figma
- Figma's short tutorials on Youtube
- Figma's Help Center for all your Figma related questions
Electronics
If relevant you can complete your physical mock-up with electronics using TinkerCAD and Arduino, as shown in electronics module.
Due to the COVID19 outbreak, you can't come to makers'lab and prototype electronics in real life with your electronics kit, so please use only TinkerCAD's components even if they're not exactly what you need : remember that you can fake some features as long as we understand your prototype and you've explained it in your documentation.
If no one in your group has chosen the electronics module in part 2, it's never too late to get started! Go to electronics ⚡️ !
Remember that you can ask for help to makers'lab managers on Slack 😊
Documentation
You must add to your documentation at least the following items:
- At least three pictures of your final prototype in a usage situation. You must add these images even if your prototype is not completely finished.
- Drawings of each element of the prototype in its final version
- The images and links of the design files (2D and 3D) that you were able to create and the list of the files you still have to design (if applicable).
- If you choosed Electronics :
- The functionalities your electronic circuit should achieve
- Its inputs / outputs / power supply
- All the components you would like to use in an ideal prototype
- The components you will use in Tinkercad
- Ideally, the embed to the beginning of your electronic circuit on Tinkercad
- If you choosed UX Design :
- The use case of your app
- The app wireframe (sketches of the screens and interactions)
- Ideally, the link to the beginning of your app mock-up on Figma
-
Two BOMs (Bill Of Materials) : one for the ideal prototype, the other for the current prototype.
You should at least be able to start listing all material, even if you don't have yet the price or precise references - The steps you have taken or plan to take to build and assemble the prototype, to be completed with written descriptions and photos as you progress.
- The tools and softwares that you have used.
Assignment
Deliverables have to be uploaded on your Notion documentation at least 24 hours before Project review, which is on .
Evaluation
Your documentation will be evaluated from 0 to 20 on :
-
Quality of your documentation: 4 points
Its ability to explain your project as a whole -
Description of your prototype: 6 points
And all its iterations - Quality of your design and fabrication: 6 points
- Quality of communication: 4 points
Now that you know what you have to do, let's go for the final sprint and the presentation of your project!