Part 1: 2D Design
Prototyping with Fab
This part of the course is an individual work, you can help each other but you cannot work together on the same project or deliver similar work.
You have until to complete and submit your documentation in the Share your project page.
In this part we will design the 2D parts of our prototype with Adobe Illustrator and then manufacture them with the laser cutter. The makers' labs on each Emlyon campus are equipped with Trotec Speedy 400 CO2 laser cutters. In this part we will discover how this tool works and we will deepen its use in the second part of the course. The term "laser cutting" can be a bit scary at first, but don't worry, it's one of the simplest manufacturing techniques!
Laser cutting uses vector files to calculate the coordinates of its movements with micron precision. This precision, difficult to reach by human hand, allows to quickly manufacture parts much more complex than with traditional tools. The only limit is the thickness of the materials that can be processed (10mm on makers' labs machines).
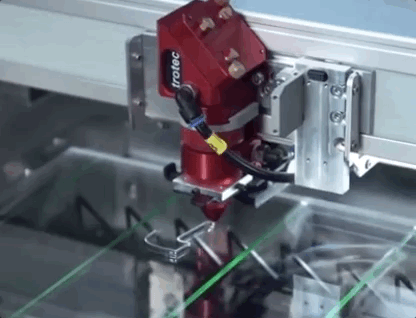
The video below gives a quick overview of the laser cutting machines you will find in the makers' lab.
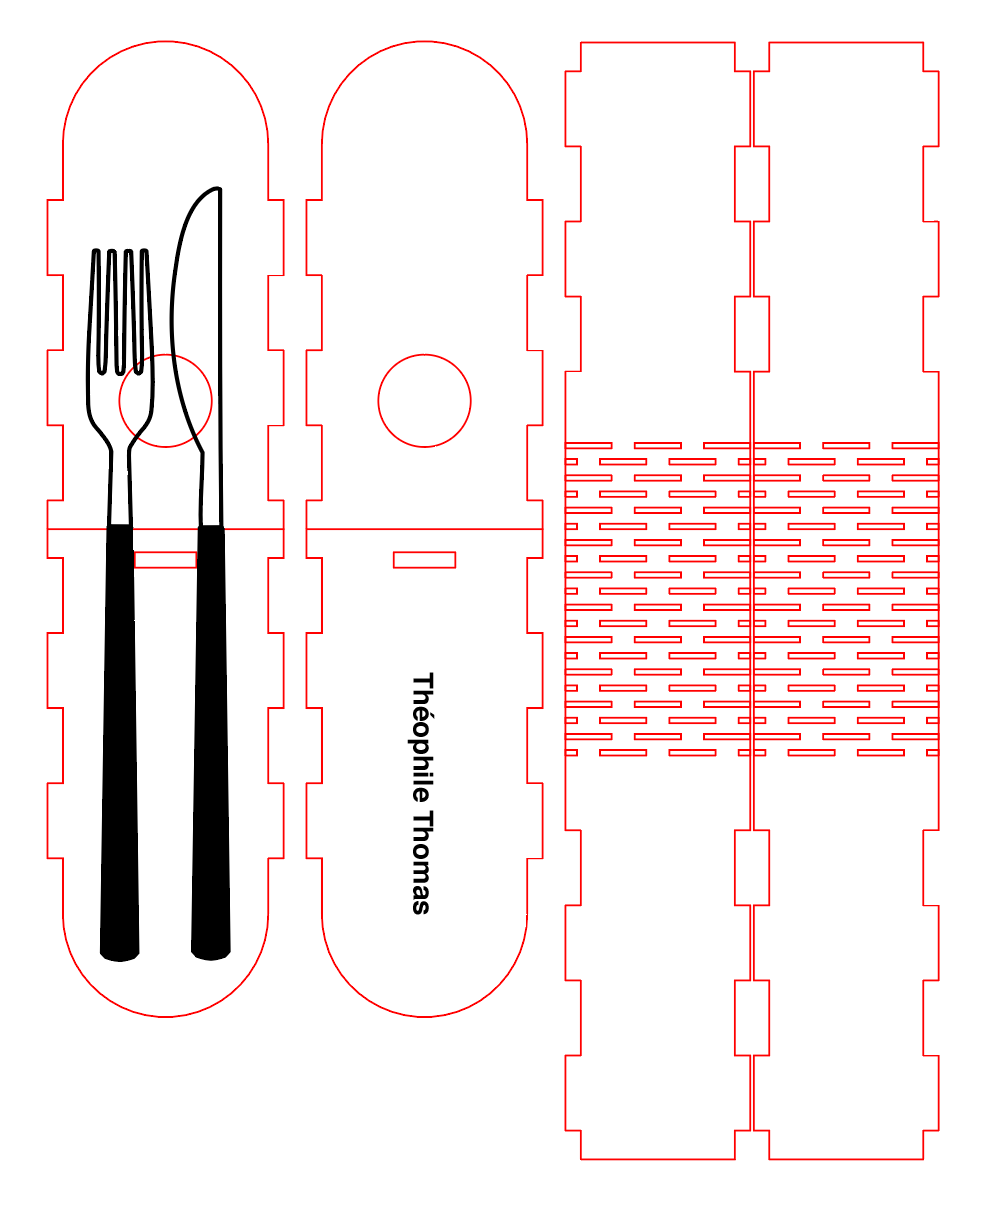
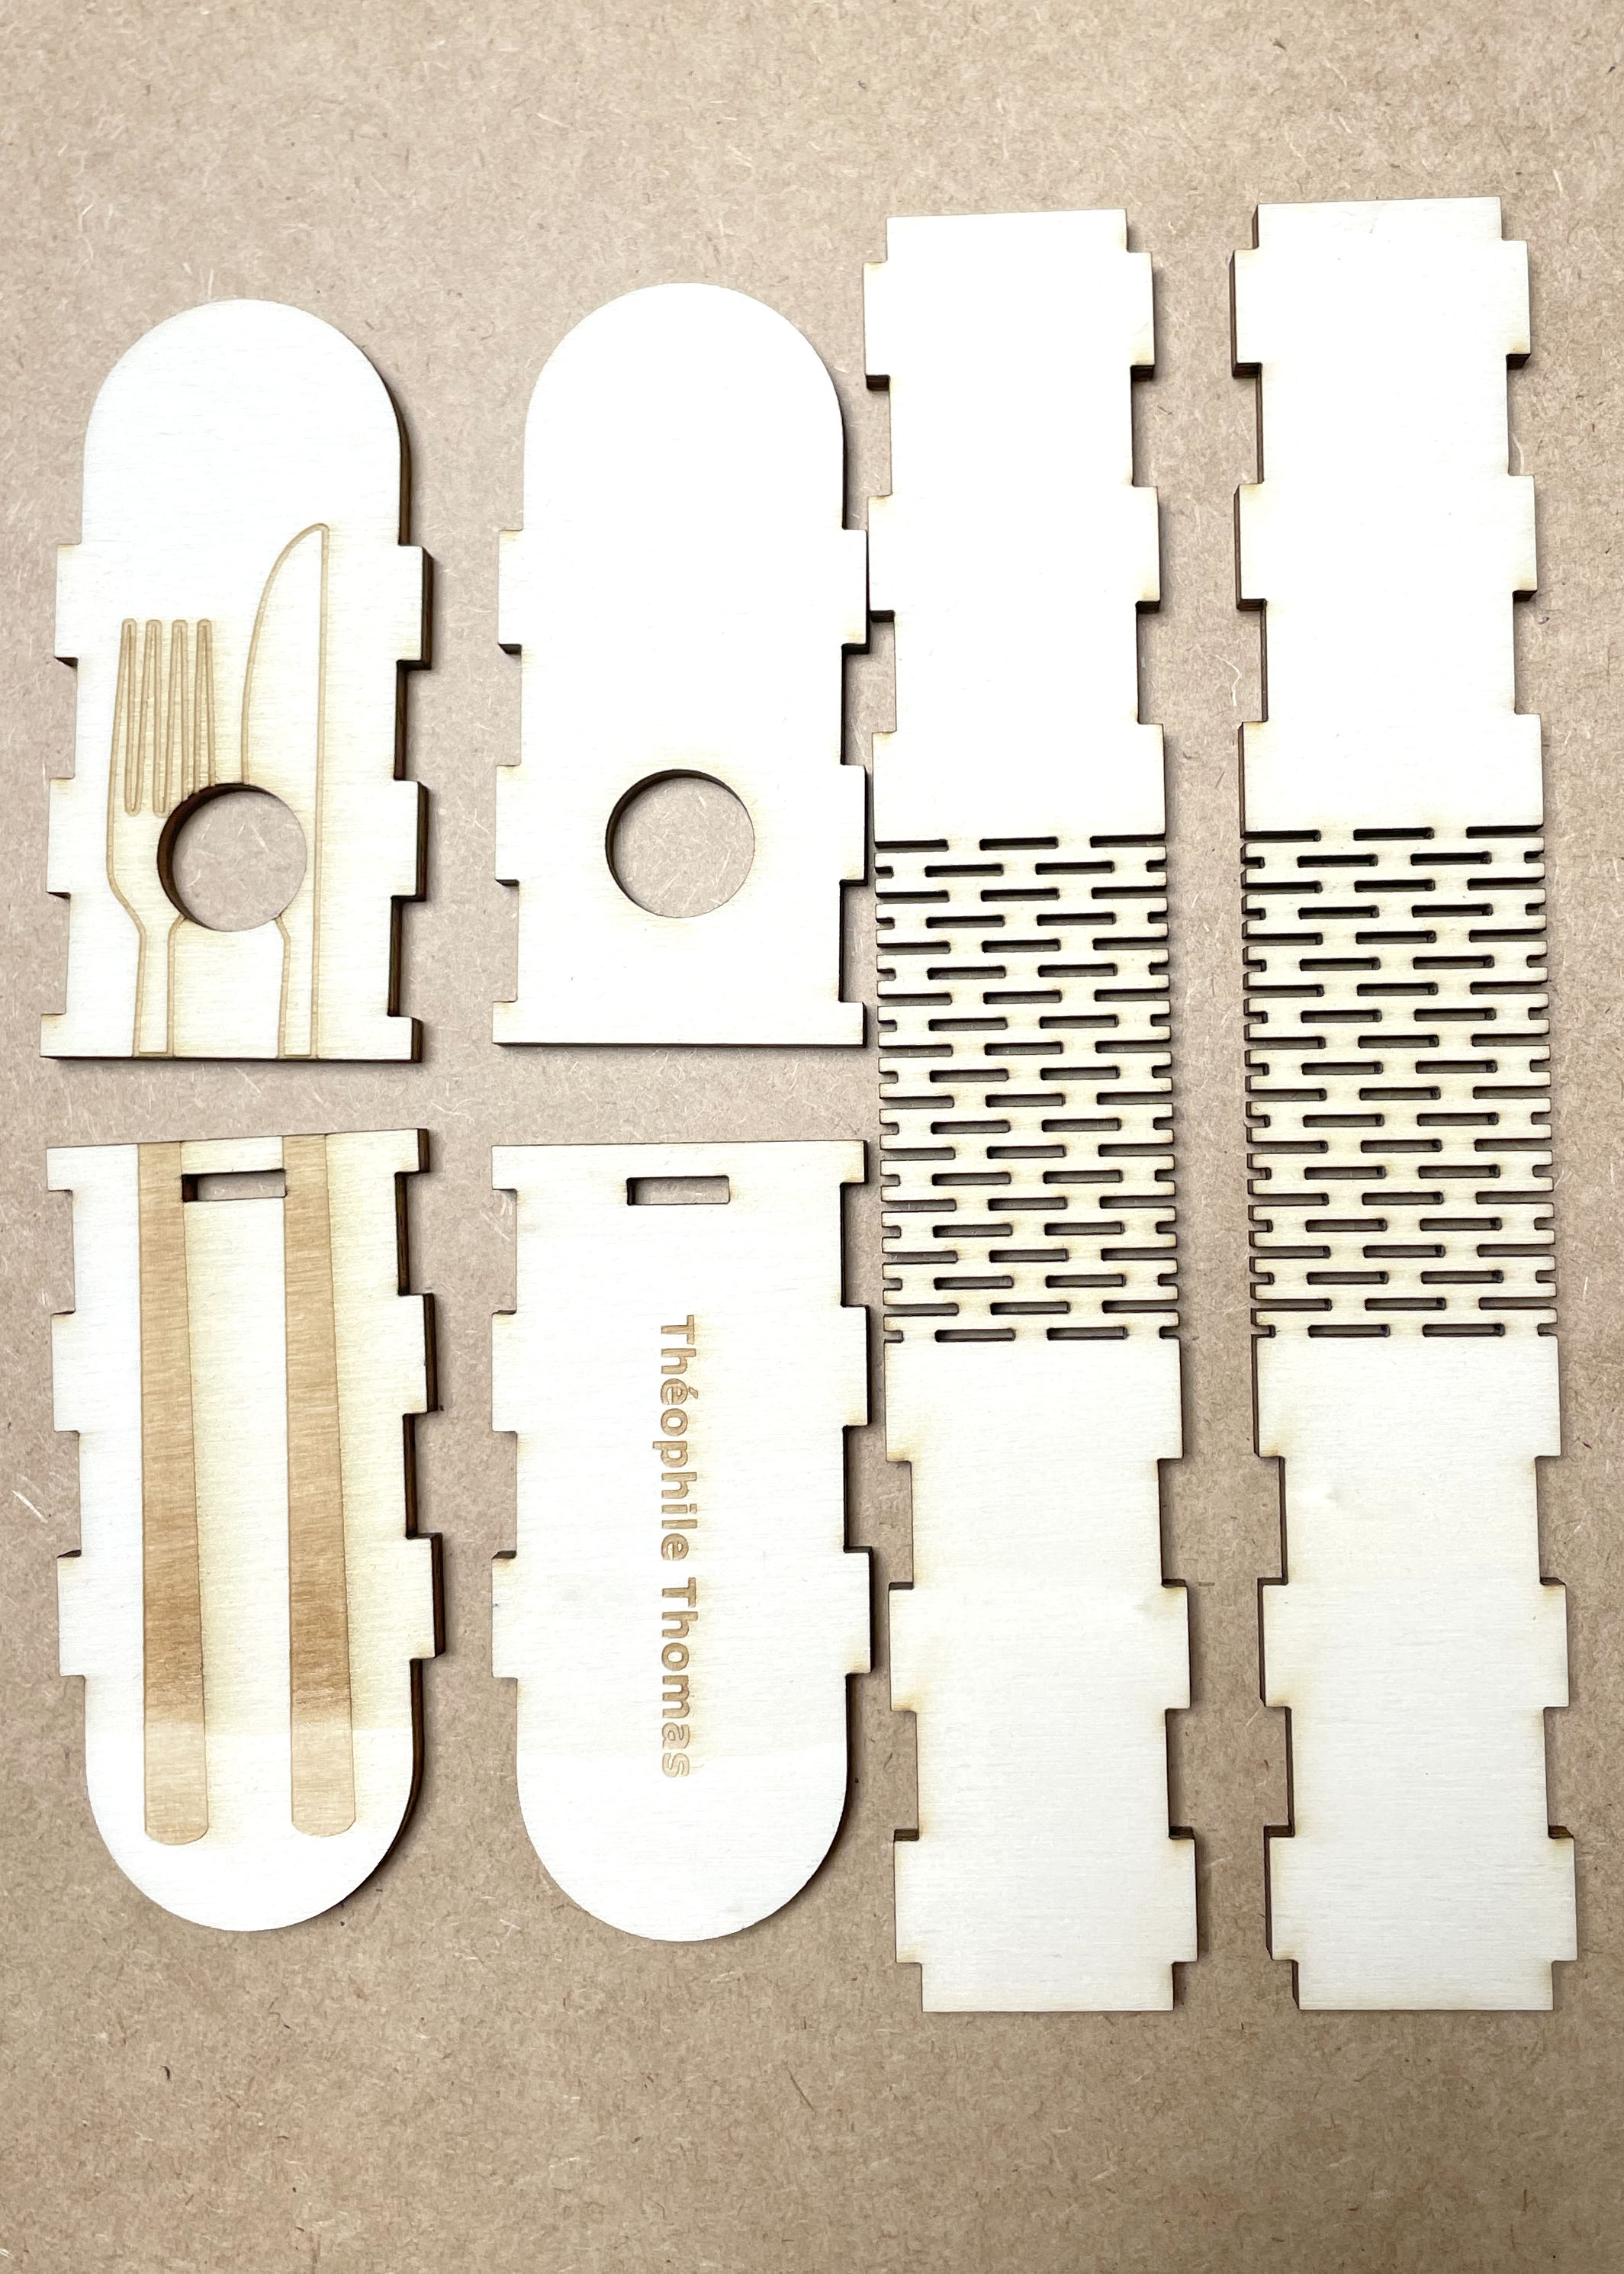
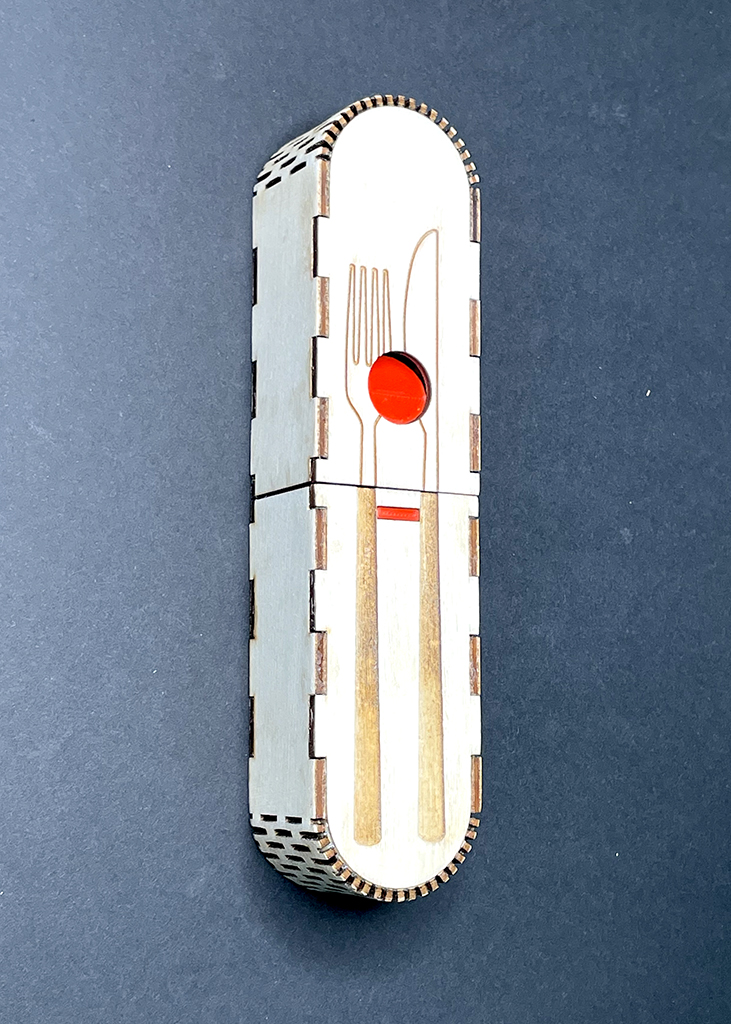
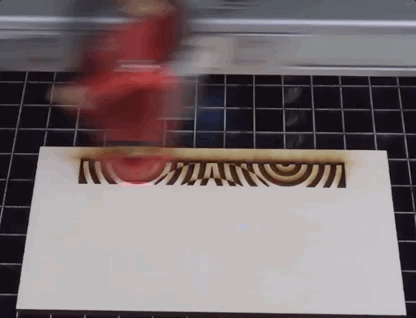
The following images show the use of laser cutting in the cutlery case example.
What's a Laser ?
LASER is an acronym that stands for Light Amplification by Stimulated Emission of Radiation. Lasers are used in many fields such as metrology, medicine, communications, etc. In machining, the laser's coherent light is focused by means of a lens to obtain a very high concentration of energy on a small surface, which makes it possible to cut or weld many materials. To learn more about the technical details of how a laser works you can watch this video. There are several types of lasers, at the makers' lab we use a laser generated within a gas: carbon dioxide, we talk about CO2 laser.
Cutting vs. engraving
With the Trotec speedy 400 laser machine it is possible to perform two different types of machining: cutting and engraving. For cutting, the machine will follow a vector path, the laser passes through the material to cut the part. To engrave the machine will make a series of very fast passes to cover the entire surface of the area to be engraved, the laser marks only the surface of the material and does not cross.
Project
Now that we understand how laser cutting works we will draw and cut the parts of our prototype.
Start by defining which parts are to be manufactured with laser cutting. Be careful: they should only be parts that can be manufactured in 2 dimensions. Add the list of parts to your documentation and don't forget to include a short description.
To find out if your part can be laser cut, ask yourself this question: can it be easily made "flat"? If it is a volume, can I easily expand it to obtain a flat surface? If the answer is no, you will have to manufacture it with a 3D printer (see 3D section).
For this course, all the 2D parts of your project must fit in a 200mm x 300mm plate of wood (medium) of 3mm thickness, you can of course make smaller parts.
The makers' lab laser cutters have a maximum working area of 1000mm x 600mm. Medium density fiberboard (MDF) is a composite material made from wood fibers, and is an inexpensive material that can be cut with a laser. Later in this module we will talk more about other materials that can be laser cut.
The medium plate will be provided by the makers' lab, however to reduce waste we invite you to use scrap materials if they are suitable for your project.
You can also use another material you have: in this case you must inform the person in charge of the makers' lab to ensure that it is possible to cut it with the laser.
Vectorial drawing
We will guide you through the design of your parts, but feel free to do things differently! The most important thing is that you get a well designed and usable design for laser cutting. To do this we will use Adobe Illustrator, a vector graphics software that allows you to create logos, icons, drawings, typography and complex illustrations for any medium. In this video, you will learn about the wide range of projects you can create with Illustrator. This software is available on all computers in the makers' labs at emlyon.
If you don't have access to Adobe illustrator, you can use Gravit Designer, you will find here resources to learn how to use it:
- Gravit youtube channel with tons of videos on how to use it
- Gravit tutorials to improve your graphic design skills
Inkscape is another alternative, free and open source, but a little more complex to use than Gravit. Here are some resources to learn how to master it:
- The Inkscape Beginner's Guide
- Tons of video tutorials on Vimeo
If your object is box-shaped you can use Makercase to help you design the plans. To use it, you just have to fill in the desired dimensions of the box and the site will automatically generate the 2D files.
The following video shows the realization of a computer support with Adobe Illustrator, the procedure will be the same for the drawing of the parts of your prototype.
In summary, to draw your parts proceed as follows:
- Start by creating a new document with the vector drawing software of your choice.
- Change the size of your work surface to 200mm x 300mm and make sure you use the RGB (Red Green Blue) color mode
-
Draw the first piece of your design:
- Refer to your PoC and drawing for dimensions.
- Draw the outline of your design with basic shapes like rectangles or circles as in the example of the laptop stand in the previous video.
- Use this frame as a basis for drawing your object with the pen tool as shown in the example in the video.
-
Optimize your design for laser cutting:
- Avoid empty spaces between your pieces to use as little material as possible.
- Set the colors: Red outline at 255 and line thickness 0.01mm for cutting, and Black or grayscale for engraving.
These color and line thickness settings are used by the software that controls the machine (Job Control) to detect the contours that need to be cut.
- Add your name as it appears on BrightSpace to your file and the date of the last modification.
- Do the same for all the different parts of your design.
- Save your file(s) in .svg format and name the files distinctly so that your project can be understood by everyone.
Laser Cutting
The design of your parts is finished? It's time to start cutting, put your files on a USB key and go to the makers' lab and proceed as in the following video.
You must watch this video to learn how to use the machine properly!
In summary, to cut your parts proceed as follows:
- Send your files from Illustrator into Jobcontrol on the computer next to the laser cutter.
- Place your 3mm thick mdf board in the machine. If you don't have a plate or can't find a suitable scrap in the "yes" cupboard, ask a makers' lab manager.
- Don't forget to focus the laser as shown in the previous video.
- Start your cutting! Keep an eye on the machine to make sure everything is working properly.
- If no one is waiting to use the machine, turn off the machine by turning the key.
- Don't forget to tidy up before you leave: small scraps of material should be thrown in the appropriate garbage can, put larger scraps that can be reused in the "yes" cupboard.
The computer next to the laser machine should only be used to send the files to the cutting machine, it should not be used to design the files!
It is strictly forbidden to leave the machine unattended! When your cutting job is started, you must stay close by to be able to stop the machine quickly in case of an emergency.
If the machine is not working properly (noise, heavy smoke, etc.) stop the job immediately and alert the makers' lab team.
Only keep scraps with a reusable surface larger than your hand ✋
Materials for Laser Cutting
With the makers' lab machine, it is possible to cut or engrave many materials: wood, some types of plastic, fabrics, leather etc. However, metals and other very rigid materials such as stone or ceramics cannot be machined with the makers' lab laser cutter.
If you do not know the composition of a material you would like to use, it is mandatory to ask the permission of a maker's lab manager on your campus.
All materials that can be machined with the CO2 laser are detailed on this website.
Assembly and finishing
Now that your parts are cut out you can proceed to the assembly of your prototype, however if at this stage some parts of your prototype are missing (3D printed parts for example) you can postpone this step until later.
MDF is a material that can easily be glued or screwed, if you don't have glue or screws ask a makers' lab manager. It is also possible to paint or varnish it, if you want to paint at the makers' lab you will need to ask permission from your campus makers' lab manager and protect your workspace.
Documentation
Import all your .SVG files into the 2D part of your documentation and add a clear description for each part. You can also add screenshots to make it even more readable. Also add images of your unassembled parts coming out of the machine, then assembled on your prototype. You can also add a video to explain your process.