Part 1: Prototyping
Prototyping with Fab
Let's become Makers!
As we saw in the introduction to the course, our world is constantly changing. In order to adapt to these changes, we need to adopt the mindset of the Makers.
The history of Makers is closely linked to that of the Hackers who in the mid-70's appropriated the first mass-market computers, the Makers are the link between digital fabrication tools, digital culture, and free software. Makers and Hackers share a desire for autonomy and a thirst for knowledge and freedom.
"(...) A hacker takes nothing for granted, everything deserves to be creatively hijacked, and the resulting variety enriches the adaptability, resilience, and fun of us all."
Fablabs: Conquering the future!
Makers often work in their own workshop, but if today most of the traditional tools and even 3D printers have become affordable, it is not the same for other digital prototyping tools such as laser cutters or other expensive CNC machines. This is why Makers often combine their resources and know-how in digital third places that are commonly called FabLabs, which are Fabrication Laboratories dedicated to innovation, creation, invention and learning by doing.
Digitally controlled machines and processes developed in fablabs allow to quickly go from a digital file to a tangible object produced locally at a lower cost. By making production tools accessible and allowing knowledge sharing, these places offer everyone the possibility to find solutions to their problems and to discover new opportunities to create value.

Source : Distributed Design
"If anyone can make anything, anywhere. That fundamentally changes the business model."
The basic principles of the Fablabs operation have been defined in the FabLabs charter.
-
What is a Fab Lab?
FabLabs are a global network of local labs that boost inventiveness by providing access to digital fabrication tools. -
What's in a Fab Lab?
FabLabs share an evolving catalog of core capabilities to make (almost) any object, allowing people and projects to be shared. -
What does the Fab Lab network provide?
Operational, educational, technical, financial and logistical assistance beyond what is available in a single lab. -
Who can use a Fab Lab?
FabLabs are available as a community resource, offering free access to individuals as well as access by registration through specific programs. -
What are your responsibilities?
-
Security
Do not injure anyone or damage the equipment. -
Operating
Assist in cleaning, maintaining and improving the Lab. -
Knowledge
Contribute to the documentation and knowledge of others.
-
Security
-
Who owns Fab Lab inventions?
Designs and processes developed in FabLabs can be protected and sold as the inventor wishes, but must remain available for individuals to use and learn from. -
How can business use a Fab Lab?
Commercial activities can be prototyped and incubated in a FabLab, but they must not conflict with other uses, they must grow beyond the Lab rather than within it, and they are expected to benefit their inventors, the Labs, and the networks that contributed to their success.
Source : MIT
The makers' labs of the emlyon business school were created on the model of FabLabs.
Today, there are more than 1000 fablabs spread all over the world in more than 40 different countries.
Fablabs are therefore laboratories where the world of tomorrow is invented. By allowing to design and produce locally, on a collaborative and circular model, they offer a framework to develop solutions to the major issues related to the different crises we are going through.
Source: urbannext
With the simplified access to prototyping tools and related knowledge that Fablabs offer, anyone can develop an idea quickly and launch their product. Of course, a convincing prototype is not the only key to the commercial success of a project, but it is an essential step to add value to an idea and reduce the risk of project failure.
The future belongs to those who prototype early!
Prototyping is a creative process that makes an idea tangible. It is a powerful tool, but like any tool, you have to learn how to use it to fully exploit its potential. In this part, we will see what prototyping is and what creative method we will use throughout this course.
For the sake of simplicity, in this course we will call "prototype" any materialization of a concept allowing to test a solution.
Source: Welgos / Getty Images
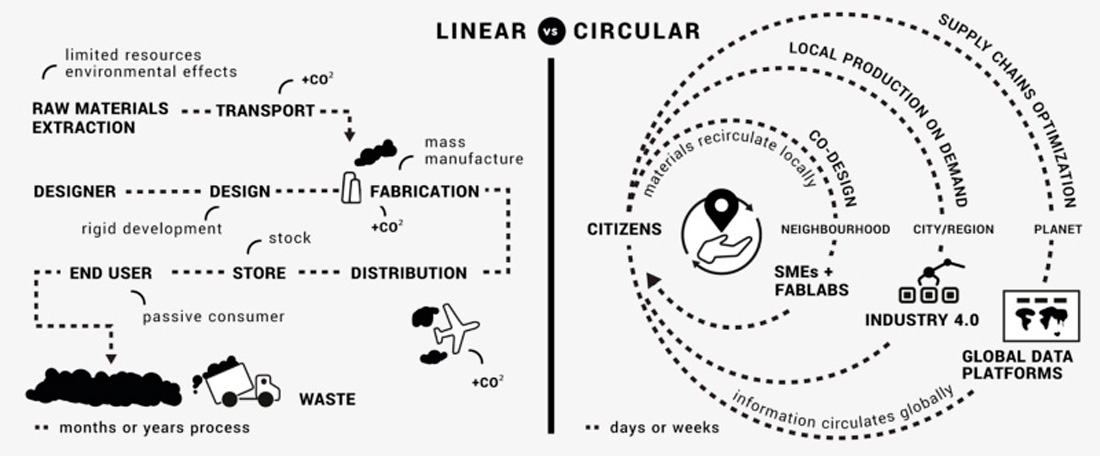
"The team at Edison's 'Invention Factory' in Menlo Park, New Jersey, tested more than 6,000 possible materials before finding the one that fit: charred bamboo."
Jennifer Latson in TIME Magazine
Let's be clear : when you make a prototype you never get it right the first time, you have to try and be prepared to fail, again and again. Error or failure is not something negative, it is always very rich in lessons if we are prepared for it and if we know how to analyze it. If he hadn't done those thousands of tests, chances are Edison would never have thought of using bamboo as a filament for his revolutionary lamp.
"I have not failed. I've just found 10,000 ways that wont work."
Thomas A. Edison
Fail often to succeed sooner: the lessons we learn from these trials allow us to refine our idea. But to identify your errors we will have to make user tests, refine your solution, and at each new version (iteration) of your prototype plan new tests to validate the evolutions.

This incremental prototyping method where the solution is progressively refined with end-user tests is largely used in companies developing innovative solutions. As the product they create is new there is no existing experience on which to build: they have to invent everything. The best solution to validate the relevance of a concept quickly is to test it as soon as possible with the end user.
Let's move on
As adults in an all-digital world most of the tasks we perform in our daily life are done in front of a screen, perhaps a computer, tablet or smartphone. This static work reduces our field of perception. We need to regain this balance between thought and action.
By thinking with our hands we call upon other forms of intelligence, we simulate our creativity, we explore more hypotheses and we make the right decisions more easily.
Making a prototype is a complex process that allows to:
-
Understand a problem or situation
Materializing makes things more perceptible -
Validate or invalidate concepts
By testing your project by adopting the approach of the scientist who tests to prove his hypotheses -
Solve complex problems
Making a model helps to deconstruct a problem to make it more readable -
Convince by demonstrating
Real-time demonstration is a powerful means of persuasion -
Find the right hypothesis
Making things concrete helps to reveal the real problem -
Debate to find compromises
The prototype is a mediation support that helps teams to agree -
Identify and avoid errors and misconceptions
By avoiding pitfalls early in the project we save time and energy that can be used to improve the product
The "typical" development of a prototype can be summarized as follows:
Proof of Concept → Functionnal prototype → Industrial prototype → Product
Proof of Concept
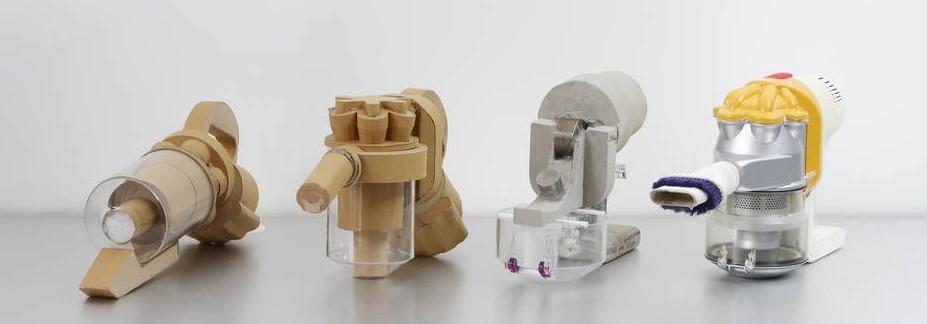
In the early stages of your project, you need to go fast and take as little risk as possible: you will therefore make what is called a Proof of Concept. The goal is to represent your idea in order to verify that it is a good lead. There is a good chance that this idea will be abandoned afterwards: Proofs of Concept must therefore be made quickly and cheaply, which is why they are often made of objects diverted from their original function, as well as light and cheap materials that can be shaped with very few tools, for example cardboard or paper.
These Proofs of Concept (or PoC) have to be manufactured quickly to be cost effective, they often consist of objects diverted or hacked from their primary function, and light materials that can be shaped with very little tooling, for instance cardboard or paper.


Source: Nintendo
The pictures above show the Proof of Concept made out of cardboard by designer Kazuyuki Motoyama to study the user experience of the nintendo Wii console. As you can see there are no electronic elements: the screens are sheets of paper that slide into an opening and the User Interface (UI) consisting of the screen and buttons is drawn by hand. At this stage it is too early to implement all the functions, the demonstrator must remain technically very simple, it can therefore simulate most of its functions but must still allow the user to be put in a situation of use.
It's mainly this type of prototype that you'll be making in this class.
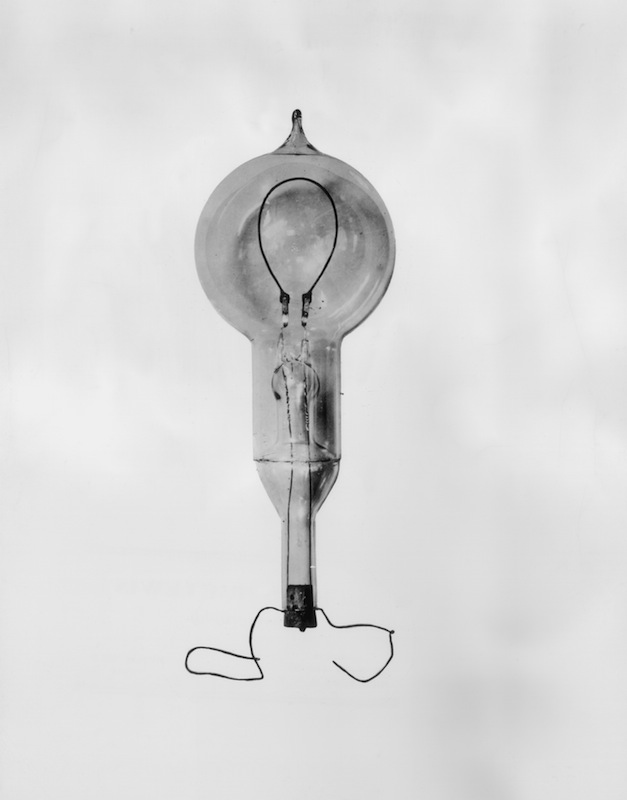
Functional prototype
The functional prototype does not simulate the functions: it actually implements them, however the components and techniques used do not correspond to what will be used in the finished product.
The photo above shows a functional prototype developed by Apple for the iPhone 4, the electronic board is far too large and does not correspond to the one that will be marketed, however the phone is fully functional.
Industrial prototype
the industrial prototype integrates the components that will be used in the finished product and is manufactured with the techniques that will be used, it looks exactly like the object that the user will hold in his hands.
Product
The product is the mass-produced version of the industrial prototype and will be widely available to users. However, this does not mean that the development work is finished; the object will be improved throughout its production to correct possible design flaws that were not identified during prototyping. Only these changes usually cost a lot of money, the role of the prototyping steps is also to reduce these adjustments as much as possible.
The development of a product can take several years, and the prototyping part alone can take several months. In this course we only have 8 weeks, which is very short! So we're going to try to master the PoC stage, and maybe the more adventurous among you will reach the working prototype stage.
What's Next ?
Now that the prototyping objectives are clearer, let's take action and Start your project